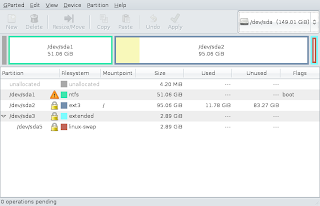
I'm assuming you know how to physically install the drive - if not, read the instructions that came with the hard disk. Be aware that any hard disk MUST show up in your system's BIOS before it will work in any OS. So if you are not seeing the drive in OS, check to see if you can see it in BIOS, and also make sure you don't have the SATA connector disabled or anything.
Once installed, boot your computer. if you don't have gparted (system menu, administration, partition editor), go to synaptic and get it.
Launch gparted either by going to system menu, administration, partition editor, or by running "sudo gparted" in the terminal.

See the dropdown box in the upper right side? Select your new disk there.
If you don't understand what a partition is, you probably need to do some more reading, and should probably stop here. But I will plow ahead...
If there is an existing partition on the drive, you can delete it from here if you like. You can also create a new partition as needed. I would suggest ext3, and apparently so would Ubuntu - when your Ubuntu setup ran, it most likely created an ext3 partition for itself to live in.
MAKE NOTE OF YOUR NEW PARTITION'S PATH (/dev/sdb1 in the example I'm using) you will need this info later
Now we have a usable drive. but it won't do much for you without mounting it.
Let's say we want to call our new drive "storage"
go to terminal, and enter the following:
sudo mkdir /media/storage
followed by
sudo chmod -R 2777 /media/storage
Of course change the word storage to whatever you want to call your drive - but make a note of it, you will be using this path again soon.This has created a mount point for our drive. I chose to put it in the media folder, because Ubuntu will load all removable media (like usb drives) there. You could put this wherever you like, and there is a mnt directory that might actually be a more proper choice. if you care, you can read about it here.
now you need to edit your fstab so that this mounts automatically.
In terminal again:
sudo gedit /etc/fstabyou will need to add a line:
/dev/sdb1 /media/storage ext3 defaults 0 0
***Note - you need to have the path of the partition and the mount point match what you found/used earlier in this tutorial***Save and exit the editor.
When you reboot next, you will have the disk ready to rock.
Can't wait for a reboot? try this in terminal:

sudo mount -a

!!!BONUS!!!
If you looked closely at my screen shot of gparted, you may have noticed that I have a windows partition on my main hard disk. Well, you should mind your own damn business. BUT yes I do have a dual boot system. If you also dual-boot ext2 IFS can be installed in windows to give access to ext3 filesystems. And now your new drive can be accessed from both of the operating systems on your machine.
No comments:
Post a Comment